Pecan Cinnamon Cupcakes


This weekend I accomplished something that has been on my list for a long time. No, not my taxes... those are still on my list. This was a lot more fun. I completely reorganized my recipe box. I received a special recipe accordion folder from my Mom one Christmas - probably at least ten years ago. It finally died - the bottom fell out. It was completely and utterly irreparable. So, I've had to move on. I bought a completely ugly but made of recycled material 3 ring binder and put all my recipes in the binder. What was fun about this little project was that I finally had a look at all my recipes. There is a lot of good stuff in there that I haven't taken the time to try as yet. Among some of those recipes I found this little gem. To be honest, I only put it in the folder a few weeks ago. It was recipe that I found in the spring issue of the
Food and Drink magazine offered at the LCBO (liquor control board of Ontario - it's a long, sad story). This magazine is really worth checking out online. Some lovely offerings here.


I'm not quite sure what is particularly spring-like enough about pecans to merit this entry in the spring issue but who cares - it looks great and the caption under the title said that it was inspired by fresh cinnamon buns (much better than the stale cinnamon bun, I agree!). The cupcakes come together quickly and they give a lovely spongy texture. The icing can be a little finicky and sets quickly so I found that I had to make sure that I had the cupcakes cooled before make the icing. However, the icing tastes like a cross between caramel and maple syrup - beautiful! Who cares about taxes!!!


Pecan Cinnamon Cupcakes

makes 12 cupcakes


2 lg eggs

1/2 cup unsalted butter, softened

1 cup granulated sugar

1/2 tsp pure vanilla extract

2 cups sifted cake and pastry flour

2 tsp baking powder

1 1/2 tsp cinnamon

1/4 tsp salt

3/4 cup milk, room temperature

1/4 cup toasted pecans, finely chopped


Icing


1/4 cup unsalted butter

1/2 cup brown sugar

1/4 cup whipping cream

1/2 tsp vanilla

1 1/4 cups icing sugar

1/2 cup toasted pecans, coarsely chopped


Cupcakes:

Preheat oven to 375 degrees F

Line 12 muffin tin cups.

Place eggs in small bowl and cover with hot tap water (to get them to room temperature)

Beat butter with sugar until light and fluffy. Beat in eggs 1 at a time and then vanilla. Thoroughly mix sifted flour with baking powder, cinnamon and salt.

Alternately add flour mixture and milk into the butter mixture, beginning and ending with flour. Stir in finely chopped pecans. Divide the batter into the lined cups.

Bake for 18 - 20 minutes or until light golden and a cake tester comes out clean. Cool on a rack.


Icing:


Melt butter in a small heavy saucepan over medium heat. Add brown sugar and cream. Stirring occasionally, bring to a full rolling boil for 1 minute. Remove from heat and stir in vanilla, cool 15 minutes on a rack without stirring.

Stir in icing sugar until smooth. Immediately ice cooled cupcakes because the frosting sets very quickly. Press a few pieces of pecan into the icing while it's still soft.


... and this is what kid #2 ate!

Carrot Cake....Cookies!


Easter weekend. It's warm, very warm, unsettlingly warm AND I've had the weekend off. What did I do over the weekend? I made hot cross buns, I went for two runs 8 and 12 km., I went biking with my kids and I tried
Hot Yoga for the first time (pretty wicked BTW). My Mother-in-law has recently returned from her yearly sojourn in Trinidad which means that Derek and I get a little time to ourselves. Off to our favourite local and we even had a chance to try another spot (2 days later - no really we're not that piggy!) reported to have the best burgers in the East end. Lastly, I made these cookies. As promised, Carrot cake cookies!


Once again... Martha. Seriously though, this recipe looked so different that I couldn't resist. I love carrot cake and especially love the cream cheese icing. I don't love my carrot cake with too much extra crap. No pineapple, no coconut - more spice cake and moist carrots topped with the sweet and tangy white icing. A beautiful combination.
The cookies themselves have all the good qualities of carrot cake but the addition of oats makes them a cross between carrot cake and oatmeal cookies. Not bad at all. Nice and squidgy (I love that word!) and chewy. The cookies have been getting rave reviews all around - even from kid #1 and kid #2 (both asked where the chocolate was at first though). I changed up the filling a bit from Martha's original - just so you know, it called for only 1 cup of icing sugar (my filling was too runny with just 1 cup) and 1 tsp of vanilla (I just couldn't do it! Nothing should take the flavour away from the cream cheese).


Carrot Cake Cookies
makes about 3 dozen

1 cup unsalted butter at room temperature
1 cup packed light brown sugar (although I used dark with success)
1 cup granulated sugar
2 lg eggs, room temperature
1 tsp vanilla extract
2 cups unbleached all-purpose flour (plus more for flattening)
1 tsp baking soda
1 tsp baking powder
1/4 tsp salt
1 tsp cinnamon
1/2 tsp freshly grated nutmeg
2 cups old fashioned rolled oats
1 1/2 cups finely grated carrots (about 3 lg carrots)
1 cup raisins


Cream Cheese Filling:
8 oz cream cheese, room temperature
1/2 cup unsalted butter, room temperature
1 1/2 - 2 cups icing sugar


In a large bowl, beat butter and sugars until light and fluffy. Add eggs and vanilla and continue to beat until well combined.
Sift together flour, baking soda, baking powder, salt, cinnamon, nutmeg and ginger. Stir to combine. Gradually add flour mixture to butter mixture. Mix well until blended. Mix in oats, carrots and raisins. Chill until firm, at least 1 hr.

Preheat oven to 350 degrees F. Shape tablespoons of dough into balls and place on prepared baking sheets, spacing 2 inches apart.
Bake until browned and crisp, 12 - 15 minutes (rotate halfway through baking time). Transfer to a wire rack to cool completely.

Cream Cheese Filling:
In a large bowl, beat cream cheese until smooth. Gradually add butter and continue beating until smooth and well blended. Sift in icing sugar and beat until smooth. Add vanilla and stir to combine.

Once cookies are cooled, spread about 2 tsp of filling on the flat side of half the cookies. Sandwich together with the remaining cookies.

Mushroom Pasta al forno (baked!)


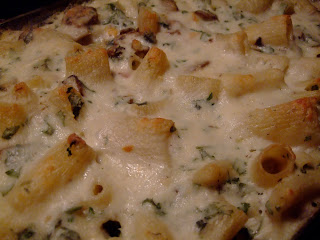
I'm really enjoying Mushrooms these days. I just heard recently that they are good for regulating blood pressure and they have high amounts of vitamin D. But, I don't care... they taste good. Funny, it's one of those vegetables which as a kid you just never see yourself eating (right up there with peppers for me... but I totally kicked that when at 9 I decided to pretend that pepper strips were just green french fries). They add so much body to a dish, even the low-rent button variety. I love them all!!! I'm also challenging myself to get more creative with veggie food (after our great visit with Brian and Civi, I'm double challenged) and this mushroom recipe fits the bill. With my new 'fresh box' from Front Door Organics I can pick and choose what I would like to get (but I think that there is a little bit of fun in getting something that I wouldn't normally pick up at the store - ya know?) so if they are not sending mushrooms this week I can substitute it for something that I don't want in the box or add it in addition to everything in my box (which is exactly what I did)... and did I mention that it gets delivered to my door... and that in most cases it's cheaper than buying it at the grocery store... and that they support local farms! Ach! I'm so excited about this... it must be annoying - I need to shut up!


Here these mushrooms are gloriously at the centre of it all. No playing second fiddle to something brightly coloured or something crunchy/crispy. Savoury, toothsome, one of life's earthy (haha, good one Wanda) pleasures. I added some Kale that came in our box as well and it's a fantastic accompaniment (I guess that it counts as brightly coloured though!). The recipe itself was inspired by a similar recipe from 'Feast' by Nigella Lawson but it's undergone enough of a transformation here to be barely recognizable to the diehard fan.


Mushroom Pasta al forno
serves 6

1/2 of a large bag of Rigatoni pasta (cooked in a large pot of salted, boiling water for about 14 minutes)

Bechamel (here it is again!)
3/4 cup of unsalted butter
1/2 cup plus 2 tbsp of unbleached, all-purpose flour
5 cups of warmed milk
1 cup of sour cream
1/4 c
up lemon juice (fresh)
1/2 cup of parmesan cheese
1/2 - 3/4 cup of grated cheese
2 tsp freshly grated nutmeg (ground is fine - use 1 tsp)
2 tsp salt
2 tsp mustard powder
1 tbsp bouillion powder (low salt)
pepper or pepper sauce to taste


Vegetables:
2 - 3 tbsp olive oil
1/2 red onion, chopped fine
1 rib of celery, chopped fine
5 cups of mushrooms (I used cremini and button but mixed is great) slic
ed
2 - 3 cups of Kale (any leafy green will do) chopped small
3 large cloves of garlic, crushed
salt to taste


Cook pasta in boiling, salted water according to the package directions. Drain and set aside.
Preheat oven to 350 degrees F.

Make Bechamel:

Heat butter in a large saucepan or dutch oven. Add in the flour and whisk well together until the mixture is smooth. Graduall
y add in the warmed milk and little at a time until all the milk has been added.
Keep at med. to low heat, whisking regularly. As the sauce thickens add in the nutmeg, salt, mustard powder and bouillion powder. Once sauce is adequately thickened (5 min. or so) add in the sour cream, lemon juice, pepper or pepper sauce, parmesan and grated cheddar. Whisk until mixed and cheese is incorporated. Set aside.


Vegetables:
In something large enough to contain the vegetables, saute the onion, celery and mushrooms until they are just wilted (about 4 - 5 minutes). Add in the kale and garlic and continue to saute until the greens are bright and wilted (I know I said there were no other bright colours - Sorry!)


Combine the drained pasta and the vegetables in a large baking dish. Mix well. Pour the bechamel sauce over everything and mix well, making sure that the sauce has gotten through to the bottom of the baking dish. Top with some more grated parmesan cheese and bake for 35 minutes or until bubbly and golden.


Yeast take 2 - Totally Trad Hot Cross Buns


I'm doing it again. I'm scared and I feel a little weak kneed. Yeast AGAIN! I really thought that my last attempt with the Cinnamon Buns was middling at best - I got a couple of good comments though that I haven't yet had the guts to follow through with but fully intend to (once I pluck up the courage).

It's Good Friday here (not Easter yet, as I've learned at the Cathedral School where I coach. Easter is on Sunday folks!) and it's totally trad to serve Hot Cross Buns on Good Friday (which wasn't really 'good' at all - go figure that one out!) for obvious reasons. Plus, on Good Friday I'm not at work, which means that I have time to wait around for these things to happen (hopefully happen).


I tried a recipe from the joy of baking website. I know that it's a crap shoot finding something on the net but this one looked pretty middle of the road AND I had all the ingredients. I'm using some more of those awesome mixed dried fruit packages that KT so kindly hands off to me (she doesn't eat them with her morning oatmeal from Starbucks). They look beautiful.


The Sultanas, the cranberries, the currants - lovely mix of colours. I also added some grated orange peel (I actually used the tangerines that came in my food box) to the recipe as well. Unfortunately, as I was going through the recipe I failed to see that I needed to add 1/4 cup of butter to the batter. So, I have no butter in mine BUT I've made sure to add it to the recipe below! With all the spices and the orange peel, this batter smells great even before it's been baked and it looks pretty too.


Hot Cross Buns (joyofbaking.com)
makes 12 buns
3/4 lukewarm milk (I used buttermilk just 'cause)
1 tsp granulated sugar
1 package of traditional yeast
3 1/2 cups of unbleached all-purpose flour
1/4 cup of light brown sugar (I only had dark)
1 tsp cinnamon
1/4 tsp cloves
1/4 tsp allspice
1/4 tsp nutmeg
1/2 tsp salt
2 tsp orange peel, grated (lemon, tangerine... whatever)
2 large eggs
1/4 cup unsalted butter @ room temperature

3/4 cup mixed dried fruit (I used dried sultanas, thompson raisins,
cranberries and currants)

Egg Wash:
1 egg white
1 tbsp milk

Glaze:
1/2 cup icing sugar
1 tbsp milk or cream


Add the sugar and yeast to the lukewarm milk. Mix thoroughly and set aside for about 10 min. or until it looks foamy/frothy.
Mix the flour, sugar, spices, salt and grated peel together in a large bowl. Once the yeast mixture is ready add it to the flour and mix well. Once mixed, add the eggs and mix well. Lastly, mix in the butter.


On a lightly floured surface, knead the dough for about 5 - 10 min (I'm doing this by hand) or until it feels pretty smooth and silky. After about 5 min. or so of kneading begin to add in the dried fruit and continue kneading to incorporate it well. Place the dough in a buttered bowl, I also put a little butter on my dough ball, cover with a clean cloth and place in a warm, non-drafty spot to rise for about 1 1/2 hrs. or until it's doubled in size.


Once doubled, punch the dough down (it should make a nice sighing sound when it's letting out the air) and form into twelve bun shaped lumps. Place each lump on a parchment or silicone sheet lined baking sheet with enough room for each bun to double in size. Brush eat bun with the egg wash. Cover again with clean cloth and put in a warm spot to rise for about 45 - 60 min. or until it's doubled in size again.


Preheat oven to 400 degrees F. Once the buns have doubled and are ready to bake, brush them again with the egg wash and with a knife make a cross on the top of each bun. Bake the buns for about 15 min. Buns should be nicely browned and a toothpick should come out clean.
Cool on a baking rack.


Mix together the glaze till smooth. Place in a little bag and cut off the corner tip of the bag. Pipe the glaze onto each bun in the cross shape that you cut on them.

These came out just as one would expect a yeast bun to come out. The spices and dried fruit complimented each other beautifully. I guess, you could say, that just maybe these were a complete success!!! ... even without the butter!

A Classic - Chicken Curry


I don't even think that I knew what Curry was until I moved to Montreal. I had never even smelled it! Of course, when I was finally introduced to it a whole new world openned up to me. The smells, the colour, the robust taste. How quintessentially Indian.... WRONG. Imagine my surprise, disbelief even, to discover that Curry is not Indian. It's English! Born and raised in jolly old. Just imagine what the world would be like without Colonialism. Well, let's not think too long about that. I think that in reality the world might be a much better place. . . Back to Curry! So, now after learning that Curry is not the Indian food connection to the world, I also discover that there are different types of Curry!
The Japanese make curry, there is west-indian curry, curries taste different depending on your geographic location throughout India and England. While I lived in Trinidad, I fell in love with west-indian curry. I'm not a total pro at this stuff but honestly, it's pretty straight forward. I would love to tell you that I have all the right ingredients, I truly wish that I did. I will do another post, once I've been to the west-indian grocery and update you on all that stuff. What I do have though is west-indian curry powder, onion, garlic, potato and chicken. Trust me, this stuff is heavenly!


I have a special pot for this stuff. Derek's Mom brought this beauty for me when she was returning from Trinidad a few years ago. I use it for a ton of stuff (Stewed Chicken, Callaloo) but Curry is right up there. I don't know... somehow it feels more authentic this way. I love it, it's heavy and kinda ugly and the price is written on the side in permanent marker! Dope!!


You can enjoy this curry with rice, quinoa, couscous or, if you are lucky enough to live near a west-indian roti shop, get some roti skins and do it like that.


Chicken Curry (West Indian Style)


2 lbs chicken pieces (not boneless if possible)
1/4 cup of butter (you can use oil too)
1 small onion, chopped fine
3 - 4 cloves of garlic, crushed
3 med. sized potatoes, cut into bite sized pieces
4 tbsp west indian curry powder
2 tbsp Worcestershire sauce
dash of Angostura bitters
a few sprigs of west-indian thyme
piece of two of pumpkin (I just leave a hunk in the dish and then pull it out once the dish is cooked - adds a nice flavour)
dash of pepper sauce (to taste)
1 1/2 tbsp chicken bouillion (liquid reduction or powder)


In a smallish bowl combine the curry powder, bouillion, spices, salt and mix with the Worcestershire, Bitters, pepper sauce and any additional water that it might take to make a medium thick paste. Once mixed to the right consistency, set aside.

Heat a large dutch oven. Keeping the heat at medium or just under. Add in the butter, once melted down add in onion and potatoes. Saute until the onion is clear (a few minutes). Add in the garlic and saute for just a couple of minutes. Add in the chicken and brown with the onion, potato and garlic. A maximum of 5 minutes here.

Once everything looks properly browned, add in the spice mixture and coat everything well. Cook without adding any extra water for just a few minutes. Then, add enough water to just start to cover the veggies and chicken. Check for taste and if you need to, use the liquid from the pot to mix some more curry paste. Once the taste feels right, put a lid on it and let it simmer at low heat for a minimum of about 40 min.


Front Door Organics and ME!


I've done it my Peeps! I've been thinking about it for so long, researching possibilities, looking at options and I've finally gone and done it. No, it's not a car, a new house, plastic surgery... I've signed with an Organic Food delivery service. Front Door Organics has been in Toronto since the late 80's I believe. There are lots of other, great players out there now but these guys offered a lot of flexibility and they delivered on a good day for us.
YES, they deliver it... to my door! Crap! Sounds too good to be true - what took me so long? Organic crap does cost more and I've been balking at the price. But, I've been doing some long hard thinking about our planet and I realise that there isn't very much that little old me can do. However, as Derek so wisely pointed out to me, it's the small things that you do everyday that will make a difference. I've also been thinking about local economies - People! Big Box stores give us awesome prices but what is the real cost to our local people and community? Where was all the stuff made in the first place? Who made it?? Ach, I'm ranting, I know...

Back to Front Door, this is one of my many 'small' choices. Sure it's a sacrifice BUT


It supports local farmers

It doesn't have chemical crap on it

The less that we buy with chemical crap on it, the less that it will be spread on fields (affecting bird, animal and human populations... oh yeah, and our water supply)

Doing it this way is a little bit cheaper than buying organic at my big box grocery store!

It encourages me to eat more vegetables (maybe some different ones too)


In short, I'm committed and I'm going to put my money (a little more) where my mouth is.
What's really awesome is that the boxes look like this when you get them. How inspiring is that?

Chocolate Crackles... this one is dedicated to my DED laptop!


I am christening my Martha Stewart Cookies book. Can you believe that I haven't made a recipe from it yet? I've been so distracted with cake making lately (and successful cakes they were!) that all my cookie recipes have gotten pushed aside. Well.... NO MORE! Out they come with a vengeance. I've been eyeing a few cookie recipes for a while and I've got to get my hands into them. A cookie rut can be hard to break and I've definitely got my favourites. You can guess... it's not hard... Chocolate Chip, Oatmeal, Straight up Chocolate and lastly a peanut butter concoction that I've been doing for a lot of years. I need some new inspiration, to break me of the 'same-old' habit. At one point a few months ago I had made chocolate chip cookies for so many weeks in a row that my daughter asked me to 'Please make something else'. That's pretty sad.


So, I have eagerly been searching through some blogs - joy the baker is a good one - and, of course, I've been enjoying the Cookie Book. I have an aversion to anything 'Martha' but this book looked so good in the store that I had to walk away with it, consoling myself that probably the only real involvement Martha had in the book was putting her name on it. But, I still have to live with the fact that I'm making this person ridiculously rich... Ach! My conscience!!! Why did it have to be her cookie book - ah well... I have some 'Carrot Cake Cookies with Cream Cheese filling' and some sweet looking 'dulce de leche' cookies on the horizon.


For now I will appease myself with these chocolate cracklers. The picture was just too alluring. Couldn't resist... didn't even try. The result was quite amazing. It has a texture that is very close to a meringue, just a little more cakey. Gooey, squidgy and gorgeous - and very chocolatey!!


Chocolate Crackles (M. S. 'Cookies')
Should make about 5 dozen (just a little under for me but awfully darn close)

8 oz (1 cup) bittersweet chocolate, finely chopped
1 1/4 cups all purpose flour (unbleached)
1/2 cup unsweetened cocoa powder
2 tsp baking powder
1/4 tsp coarse salt
1/2 cup unsalted butter

1 1/2 cups packed brown sugar
2 lg eggs
1 tsp vanilla
1/3 cup whole milk
1 cup granulated sugar
1 cup icing sugar


In a bowl, over simmering water, melt the chocolate. Set aside to cool.

Sift together, flour, cocoa, baking powder and salt.
Beat butter and brown sugar together until pale and fluffy. Mix in eggs, vanilla and melted chocolate. Mix well.
In small batches mix in flour and alternate with milk - begin and end with the flour.

Divide the dough into 4 equal pieces, wrap them and refridgerate for about 2 hrs.

Preheat oven to 350 degrees F

Divide pieces into 1 inch balls. Roll in granulated sugar and then icing sugar. Space 2 inches apart on a lined cookie sheet (parchment or baking mat)


Bake about 14 minutes or until the surface cracks (rotate sheets half way through)
Cool on wire racks and store.


As a p.s. to this recipe. I have experienced a huge tragedy recently. My laptop died. It was a Macbook pro from 2003! To say that it had a long life is an understatement and to be quite honest, I'm sure that if we took it in we could have something soldered for about $90 and be back in business. The truth is though that it's time to say goodbye to it. We knew it was coming but just wanted to put off the inevitable as long as possible. I feel almost as attached to my Mac pro as I did to my first gen. green mac mini - ahhhh, my sweet baby!!!

I will be blogging from Derek's computer for a while but will let you all know when my new mac lands in my hands!

To my dear old laptop... this plate of cookies and glass of milk are for you. RIP xoxo

Powered by Blogger.

Archivo del blog

My Favourite Cookbooks

  • Naparima Girls High School Cookbook
  • The Silver Palate Cookbook
  • More-with-Less Cookbook
  • Moosewood Cookbook

About Me

Followers

Search

Blog Archive

About

Pages

FBC Member