Bok Choi, Ground Pork Stir Fry

I remember having a conversation with KT a couple of months ago. I was, once again, lamenting over being exhausted and feeling unfulfilled by the things which are really supposed to be fulfilling (if poor KT had a dime for every time I bitched about feeling tired and/or wanting to find myself she would be rich - what a great, patient friend). KT asked me what I would do if I didn't have to work for a pay cheque. That was easy...
I would :
Run
do Yoga
Garden
go back to school for a Masters Degree
Volunteer
Bake
Cook
Bike
go to the Market
Read
Jeez, I can't make money doing any of that! However, on my holiday earlier this week I got to do quite a few of the things on my list. It was totally a 'fun' day - running, gardening, cooking, baking, reading... sleeping.
My garden got a huge kick in the butt and I'm happy to tell you that I've got my beans,

carrots,

zucchini

and tomatoes

planted. I still need a few more things in there but hey... it's a start and it was so awesome to just be outside putting what will hopefully grow into food into the ground.
In the meantime, my refrigerator was empty... well, almost. It is totally empty now. I made this little beauty and it was delightful.

Let's talk for a minute about ground meat. I find that I have to season ground meat quite intensely for it to really have some serious flavour. This is why I like doing something like a curry or a soy sauce thing - those flavours are so strong. The recipe below is based on that. I just kept adding another bit of whatever into the pot until I liked the flavour that I got. Feel free to add or subtract as your tastes dictate. I had a little bit of cabbage left in the crisper and threw it in to get it used up - feel free to add more bok choy or some other green if you have it.

Bok Choy and Ground Pork Stir Fry
serves 4
1 lb (approx. - it's very loose) ground pork
3 - 4 cups bok choi, chopped
1 small onion, sliced
1 cup cabbage (or other greens if you have), sliced thinly
4 cloves garlic, crushed
5 heaping tbsp freshly grated ginger
4 tbsp Soy Sauce or Tamari
4 tbsp Oyster Sauce
1 heaping tbsp Hoisin Sauce
1 tsp red pepper flakes (optional)
Heat a Wok over med/high heat. Turn the heat down to medium. Add in some oil (about 2 - 3 tbsp). Throw in all the veggies save the garlic. Stir frequently until the bok choi begins to soften. Add in the garlic and the ginger. Continue to stir frequently for about 3 minutes.
Add in the ground pork and cook together with the veggies for about 5 minutes.
Add the soy sauce, oyster sauce and Hoisin Sauce. Turn the heat down to low.
Add in the red pepper flakes.
Check the taste and adjust if necessary.
Serve over rice.

Rhubarb Streusel Muffins

Sometimes the gods just smile down on you. We all had a holiday earlier this week. In Canada we still celebrate Queen Victoria's birthday with a day off and fire works - it's weird, I know. If you're not sure who Queen Vic is just google her and you'll get the scoop.
So, I'm gettin my garden working again... the weather is generally great. I go for a run. I continue finishing up my garden work. I start cooking and get two dishes done for the week to come. Then I go outside and cut some of this

out of my rhubarb patch... how heavenly is that... I get it from my backyard. I'm feeling so pleased with myself while doing this.

I proceed to make these stupid easy muffins (which Kids might not eat because rhubarb isn't sweet and chocolatey but that's another post). Next thing I know, the doorbell rings. It's my Mom-in-Law and her husband. They decided to drop by for an impromptu visit. This is totally awesome for me because even though I haven't cleaned my house and there are toys everywhere in the toy room, the kitchen floor hasn't been swept since the morning and it's now strewn with grass and dirt from outside, Kid #2 decided to bring his pillow and comforter downstairs so that he could 'sleep' on the living room floor and I haven't even looked in the bathroom yet, because I haven't even looked in said bathroom I also haven't looked in mirror and/or brushed my hair, I still have my gardening clothes on... I've got homemade muffins to serve them.

Let me tell you, I had put those muffins on plate for them before they'd even gotten their shoes off. Nothing can distract you from the mess around you like some good food. Also, it made me look like a domestic goddess (to coin a phrase) having these things ready to put out for visitors.
Now granted, I was still pushing things out of view with my foot while keeping my eyes fixed intently on the person in front of me but what the hey... I made muffins. They oh'd and ah'd about the muffins and then gave me bonus points for harvesting the rhubarb from the backyard... score.
So I'm trying hard to think of what the moral of this story might be. What the hell... make muffins and then see what happens.

Rhubarb Streusel Muffins
makes 12 med/large muffins
2 1/2 cups all purpose flour
1 tsp baking powder
1 tsp baking soda
1/2 tsp salt
1 egg
1 cup buttermilk
1/3 cup melted butter (unsalted)
3/4 cup brown sugar
3 cups chopped fresh rhubarb
(Streusel - I used some of the streusel from Ottolenghi that I still have in the freezer - 3/4 cup flour, 1/4 cup sugar, 1/2 cup cold butter - combine until it forms a good crumb - freezes for a long time. Feel free to use any streusel topping that you might fancy)
Preheat the oven to 400 degrees F.
Line a muffin tin with liners.
Combine the flour, baking powder, baking soda and salt together in a bowl and set aside.
Combine the egg, buttermilk, melted butter and brown sugar together in a bowl and whisk until it's all well combined.
Add the flour mixture to the milk mixture. Stir just until the flour is completely incorporated.
Add in the rhubarb and mix together.

Scoop into prepared muffin cups. Sprinkle with about a tablespoon or more of the streusel.
Bake for about 15 - 20 min (mine were done after about 17 min. so keep an eye on them at the end), check with a tester to make sure that the batter is done.
Cool for a couple of minutes before removing from the tins.
Here's what I did with Fiddleheads

Yup. I got some fiddleheads. It's spring... in Canada... it's a tradition thing... I've never had them before - I had to add that because sometimes we just spew out these things, items, veggies, traditions, whatever that we're all supposed to know and revere... Yeah, fiddleheads are this big spring thingy and are a big deal AND I've never eaten them, made them, foraged for them... nothing.

Fiddleheads are the first bit of an ostrich fern that begins to curl it's way out of the thawing ground in the spring. It's a lovely thing when you think about it, slowly unfurling itself toward the sun and warmth of the new season (except we haven't had much of either over the last couple of weeks here in T.O - yeah, I'm a little bitter). Their season is short, much like asparagus, and they have some great nutritional and health benefits. Fiddleheads are like morels in that they are often just foraged for as well and not necessarily farmed. Whatever, its all good. I got mine from the food box and I'm happy with that.
Fiddleheads taste like... greens, I guess. They certainly don't taste like chicken. They have a lot more bit to them than greens do though. Kid #1 wasn't in love with them but she ate them happily enough. I know of a lot of people who did not like asparagus at first either. I think it's one of those tastes that needs to grow on you. I'm interested in trying some other recipes with these though. So, a new challenge begins - back to the spring produce. I have to think... stir fry's, omelette's, quiche. I can probably use fiddleheads just like I would use any other green. I like the seasonal aspect of using them. Things somehow seem more special when you don't just cook the same way all year around. It feels amazing to have something green and fresh to eat that's not just a leaf - ya know? These things are not around for long so it's special to have them when they are in season and fresh... Plus, they're kinda weird looking which also has some cache with me. Asparagus (another weird looking spring veggie) will be coming in as well, probably very soon - even next week. Spring has arrived even if the sun has forgotten for the last little while.

Baked Penne, Fiddleheads and Mushrooms
serves 6
4 cups cooked penne pasta (reserve a little pasta water)
1/2 cup onion, diced (ramps or young leek would be even better)
2 cups fiddleheads
3 cups mushrooms, quartered
2 cups spring greens (spinach, dandelion, whatever)
1/2 cup cream cheese
1/2 cup goat cheese
1/2 cup parmesan cheese
1 tbsp each: oregano, basil, parsley (use fresh if you have)
1 veggie bouillion cube (low salt, organic)
1 1/2 cups cream or milk
salt and pepper sauce to taste
Preheat oven to 425 degrees F.
Heat a large pot over medium heat. Throw in some oil (2 or 3 tbsp will do) and add in the onion, fiddleheads and mushrooms. Lower the heat to med/low and toss it gently for about 7 min. or so. Add in the greens and let the greens wilt.
Add in the cream cheese and goat cheese and mix it into the veggies until the cheese is creamy. Add in the herbs, bouillion cube and cream or milk. Once the cream has heated a little add in the parmesan leaving out just enough to sprinkle over the top of the casserole dish.
Add a little of the pasta water if the mixture is still too thick. Make sure the thickness is good for you. Add in the salt and pepper sauce to your own tastes.
Remove from heat and add in the cooked pasta. Mix well and pour into a casserole dish. Sprinkle the remaining parmesan on top.
Bake for 15 minutes or until a little brown and crispy on the top.
Cool slightly before serving.

And now... Brownies.

I'm on a stupid roll here... first it was yet another chocolate chip recipe and now... another brownie recipe. It's an illness.
I need therapy.
I have no defence.
In any case, nobody in this house is complaining about my issues - at least when it comes to baking.
What was supposed to be our rainy, crappy long weekend turned out to be warm and more proportionately sunny than rainy. That's enough to celebrate right there. I got to cap off my long weekend with my friend T coming over. Once the kids were in bed and D got home from a gig we all laughed and drank merrily AND ate... these... right? No complaints... remember.

What's more... two days later I got to spend the afternoon with my BFF (yeah I'm an adult and I use the term BFF - get over it) KT. We meandered, we shopped (visiting some new shops is always fun), we sat down for drinks and chatted, drank and had some nibbles. Even later, D and I finally got a chance to go out ourselves and enjoy a belated anniversary celebration.
I have to tell you another thing about my quirky self. I used to love lay-away. I know it's ghetto... whatever... it was awesome. No one does it anymore and hardly anyone even remembers it. Now that we all have credit cards and want things immediately we've done away with the habit of saving or paying something off slowly and not having it in our hands until it's paid. So... what I do now is buy gift cards. Every month I buy a gift card for whatever shop I want to purchase something in and once I have a significant amount of money then I go and do a guilt free shop. Over the last year and a half (yeah - it took me that long) I saved enough gift cards to go and buy myself this awesome bag at Roots (a canadian company no less). I was pumped. KT joined me in the fun... it was awesome.

So that was my weekend, which has nothing to do with brownies but do brownies really need a whole lot of writing to prop them up? I don't think so.
P.S. as Dave said in the book... don't skrimp-out on the 1 minute of vigorous stirring (think of it as part of your workout) - it makes a difference and it's pretty cool to see the batter transform.

Dave's Friends Best Brownies adapted from Dave Lebovitz 'Ready for Dessert'
makes 1 square pan
6 tbsp (3 oz) unsalted or salted butter, cut into pieces
8 oz (225 g) bittersweet or semisweet chocolate, chopped (I used Lindt 70%)
3/4 cup sugar
1 tsp vanilla
2 lg eggs at room temperature
1/4 cup all purpose flour
1 cup of white chocolate chunks (I used Green and Blacks)
Preheat oven to 350 degrees F.
Line a 9 inch square baking tin with parchment or aluminum foil. Lightly grease the inside of the lining.
In a double boiler (I use a stainless steel bowl over a simmering pot of just a little water) melt the butter. Then add the chocolate and let it melt and become smooth. Remove from heat.
Add in the sugar and vanilla until well combined.
Add in the eggs one at a time, mix well after each addition.
Add the flour and whisk energetically for a full minute (I did a little longer - because I didn't follow the recipe correctly). The batter will become smooth and glossy and pull away from the sides of the bowl.
Pour the batter into the prepared pan.
Press the white chocolate chunks randomly into the top of the batter.
Bake for about 30 minutes (I did about 25 because I really prefer gooey brownies - ie. slightly undercooked)
Cool before removing from the pan.

Creamy Cabbage Gratin

When it's a long weekend I sometimes start anticipating the end of it before it even begins. It's kinda crazy. There are so many things that I want to pack into the time. This particular long weekend my list has been especially long.
The May long weekend (Victoria Day here in Canada) is traditionally the weekend when it become safe to plant all your annuals and vegetables. So, that's the first thing on my list. So far I have some onion, some tomato plants. I also got these...

and I'm pumped about getting all of this in the ground. It's a start.
Kid #2 needed new shoes and a haircut... got that out of the way.
We were also getting together with one of my best friends. We've known each other for just over 20 years, through way too many ups and downs to even start listing.
Having my friend T coming over meant cooking... which lead me to finally get to this spot. I've been eyeing it for a while. We decided recently that we were committed to finding meat that was both local and grass-fed or pastured. However, that usually means getting in touch with local farmers or joining a meat CSA (yes, they do exist people) and, most importantly, investing in a chest freezer. We will invest in a chest freezer eventually but just don't feel like we're in a position financially to do it right now. So when I spotted this place I had to check it out. Sure enough, grass-fed, local, mennonite farmers and I can purchase just what I need without over stocking. I finally got there yesterday and brought home a fresh chicken that blew me away... beautiful.
So, roasted chicken, roasted carrots, mashed potato with chives and sour cream, gravy and brownies (post is on it's way) were on the menu last night. But I was feeling pumped and kinda antsy. I also knew this that cabbage had been waiting so patiently for me to give it some love. I had to try this.

The recipe is from Deborah Madison and it's a beautiful, simple, tasty way to incorporate cabbage in a meal. It was not terribly labour intensive but managed to be more than satisfying...
We had a great time... eating a lot, drinking even more and laughing freely... more fun crossing something off of a 'to-do' list than should be allowed and a wonderful kick-off to a long weekend.

Creamy Cabbage Gratin adapted slightly from 'Vegetarian Cooking for Everyone'
serves 4 or 6 (as a side)
Butter for the baking dish
1 1/2 lbs (about 5 cups) cabbage (savoy or green), sliced into 1 inch thick strips
1/3 cup flour
11/2 cups milk
1 cup sour cream
3 eggs
1/2 cup cheddar grated
1/2 cup parmesan cheese, grated
3 tbsp parsley or dill, chopped fine
1 1/2 tsp salt
2 tbsp tomato paste (I used a small amount of ketchup - didn't have the paste)
1 tbsp Worcestershire Sauce
dash of pepper sauce or cayenne
Preheat the oven to 375 degrees F.
Butter a deep sided baking dish and set aside.
Boil the cabbage in salted water for about 5 minutes. Drain and press out as much water as possible. Set aside.
Whisk together the remaining ingredients. Combine everything in the baking dish. Make sure that the liquid almost covers the cabbage. Add a little more milk if needed. Sprinkle a little parmesan cheese on the top of the baking dish.
Bake about 40 min (the recipe says 50 but mine was starting to burn at the edges by about 42 minutes or so). Keep an eye on it and if it needs 50 minutes then that's cool.
Cool a little and serve.

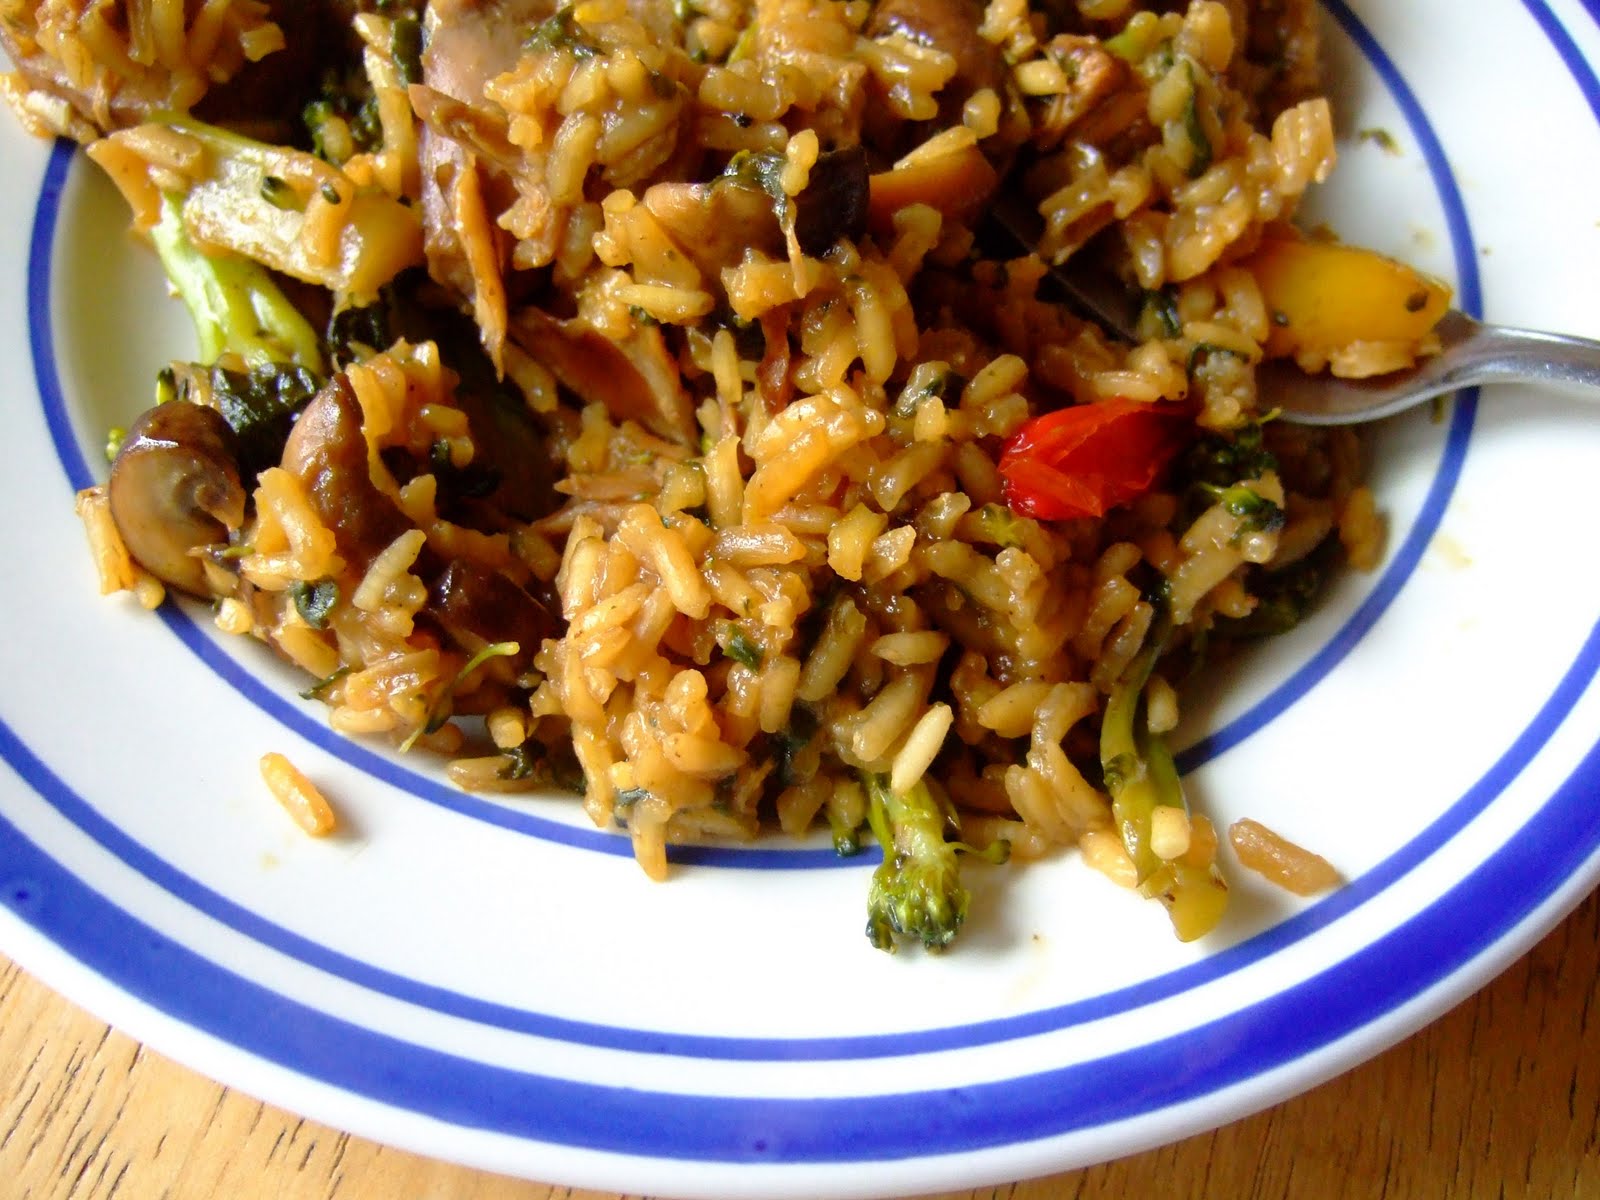
Saffron Rice Fast Food

You know things are changing for you when the above becomes your idea of fast food... but there it is.
We had a crazy saturday at our house last weekend. Kid #1 had a dress rehearsal in the north end of the city. Then she had a music theory exam downtown. Then we picked up my mother-in-law and we all went to Kid #1's Choir concert back in the north end of the city. Then we collapsed.
Fortunately, Mom-in-law provided dinner for us but lunch... well that had to be on the road.
Here is where I could have just gone to a drive thru and gotten it done, right? Wrong. I thought about it and decided that:
a. We have perfectly good food that will go to waste here if it doesn't get eaten.
b. I don't actually like fast food (except for Taco Bell... there I said it)
c. Kid #1 needs to have something better than fast food in her belly before this exam and to get her through the rest of her afternoon.
d. I don't want to spend the money.
So, I cooked up a mean stir fry, threw in some chick peas, tossed it with some rice, put it into containers and we took that with us for lunch. You know what? It was good... really good. Nobody missed the fast food, nobody asked for the fast food and we felt better nourished. The cash we saved with our lunch went to treat ourselves to this after the theory exam... and I'm not sorry for it one bit. I'm not giving you that recipe yet though... sorry.
What I've got here is another example of fast, good for you and tasty. It's a kitchen sink kind of thing. Whatever I've got in the veggie drawer goes in. If you have some leftover meat, throw that in too. Don't have any rice? Use some orzo or couscous... whatever. I added in some saffron because I thought that it would taste out of this world... yeah it makes a big difference.

The better the stock you use the better the dish will taste but honestly it's not a deal breaker. I did happen to use some wicked-ass stock that I made last week out of 4 chicken carcasses but dang, I'd use bouillion cubes in a pinch.

So if you are wondering whether to pick up the phone or get in the car to get yourself some fast food... at least give a thought to what you've got in the fridge and pantry. Think of the benefits.

Kitchen Sink Saffron Rice
serves 4 - 6
3/4 tsp of saffron (soaked for 10 - 15 minutes in a little water)
1 1/2 cups uncooked rice
3 cups broccoli florets
1 small onion, diced
1 cup (or so) pepper, diced
3 cups mushrooms, quartered
3 cups spinach, stemmed and diced
3 cups good quality stock
3 tbsp of mixed herbs (your choice)
2 tsp salt
pepper sauce (come on, you know I gotta throw that in)
Heat a large pot over medium heat. Throw in a little oil or grease or butter (whatever you got) and add in the veggies. Toss that around for a few minutes, letting the veggies begin to get a little soft.
Turn the heat down a bit and add in the rice. Toss the rice with the veggies until everything is well mixed.
Add in the stock, saffron, herbs, salt and pepper sauce (optional). Stir well.
Cover and simmer over low heat for about 20 minutes or until the rice is cooked. Check and make sure that you don't need to add more liquid half way through.
Cool slightly and serve. Feel good about what you've done today.
Dave's Chocolate Chip Cookies

When exactly does one need yet another chocolate chip cookie recipe? Especially when one has so many chocolate chip cookie recipes already. Not to mention, some great chocolate chip cookie recipes in there. Remember these? And these? And how about these lovelies?
Turns out that I have a thing about repeating old recipes and I love trying new ones. Is this particular cookie version monumentally, earth shatteringly different than some of the other chocolate chip cookie recipes? No. But here is why it was important for me to make these cookies today:
1. I got this cookbook and needed to try something from it ASAP.
2. After the failed whoopie pie event earlier this week, I needed something soothing and familiar.
3. I haven't baked with chocolate in a while.
4. I like eating chocolate chip cookies.
5. It's raining outside.
6. This is the first day off I've had in two weeks. I need a reward and YES I do reward myself with food 'cause, damn... life is too short.
I could go on but it's all going to revolve around the same points really.
These cookies called for ludicrous amounts of chocolate - I'm there. I left out the nuts because... I just did ok. I didn't want anything polluting my chocolate chip cookie experience today and nuts would have been cookie pollution.

Also, it seems that the key to fantastic, out of this world cookies is to let the dough rest. So, I let it rest... in my fridge for 24 hours give or take. The rest of the recipe is pretty much nothing you haven't seen before. Just for the record the log slicing thing didn't work for me because I used ludicrously large chunks of ludicrous amounts of chocolate so I kinda had to break my logs up and then form them from there.
So, this rainy Sunday afternoon found me sitting on me couch, curled up in a blanket, watching something mindless, feeling just so slightly sorry for myself (stupid whoopie pies can chew my crust - but don't worry, I'll try them again) and eating awesome chocolate chip cookies.

Chocolate Chip Cookies adapted slightly from Dave Lebovitz
2 1/2 cups all purpose flour
3/4 tsp baking soda (oops, I used baking powder)
1/8 tsp salt
1 cup unsalted butter at room temperature
1 cup light brown sugar (I used muscovado)
3/4 cup sugar
1 tsp vanilla
2 lg eggs at room temperature
2 cups nuts (walnuts, pecans, macadamia...) toaste and coarsely chopped (I didn't do this)
14 oz or 3 cups chocolate chunks, chips ... whatever
Combine the flour, baking soda and salt together in a bowl and set aside.
Cream together the butter, vanilla, brown sugar and sugar together in another bowl until light and fluffy. Add in the eggs one at a time and mix well after each addition.
Combine the flour and butter/egg mixture. Mix until well incorporated.
Add the nuts and chocolate chips.
Form the dough into two logs (about the diameter of a paper towel roll), cover and refrigerate for about 24 hours.

Preheat oven to 350 degrees F.
Line a baking sheet with a silicone liner or parchment paper.
Cut each log into 1 1/2 inch thick discs. Place on the liner, leaving space between each cookie.
Bake for about 10 minutes (I baked mine sometimes just a little less so they would be gooier)
Remove from oven and cool on a cooling rack.

Subscribe to:
Posts (Atom)
About Me

About Me
FBC Member

